Battery switch on travel trailer function is crucial for managing your RV’s power. Understanding how it works – from the different types of switches to troubleshooting common problems – is key to a smooth and safe camping experience. This guide will walk you through everything you need to know, from basic operation to advanced maintenance, empowering you to confidently manage your travel trailer’s power systems.
We’ll cover the various battery types commonly used in RVs, explaining their pros and cons and how they interact with your battery switch. We’ll also delve into safety procedures, preventative maintenance, and optimization techniques to maximize the lifespan and performance of your system. By the end, you’ll be equipped to handle any power-related situation with ease and confidence.
Types of Travel Trailer Battery Systems: Battery Switch On Travel Trailer Function
Choosing the right battery system for your travel trailer is crucial for reliable power and a comfortable camping experience. The type of battery you select will directly impact your ability to run appliances, lights, and other systems while off-grid. This section will compare and contrast different battery technologies, helping you make an informed decision.
Lead-Acid Batteries
Lead-acid batteries are the traditional choice for many RVers due to their relatively low cost and wide availability. However, they have limitations compared to newer technologies.
- Lifespan: Typically 3-5 years, depending on usage and maintenance.
- Charging Requirements: Require a multi-stage charging process to prevent overcharging and sulfation. They benefit from periodic equalization charging.
- Weight: Significantly heavier than lithium-ion batteries of comparable capacity.
Lead-acid batteries’ lower cost makes them attractive, but their shorter lifespan and higher weight can become drawbacks over time. Their susceptibility to sulfation, which reduces capacity, requires careful charging management. The weight can impact your trailer’s towing capabilities and maneuverability. Their impact on the battery switch is primarily related to their higher current draw during startup and their larger physical size, which may require adjustments to the switch’s wiring or housing.
Lithium-Ion Batteries
Lithium-ion batteries are rapidly gaining popularity in the RV world thanks to their superior performance characteristics. They offer significant advantages over lead-acid, but come with a higher initial investment.
- Lifespan: Typically 8-10 years or more, with significantly more charge cycles than lead-acid.
- Charging Requirements: Generally simpler charging profiles; many lithium-ion battery management systems (BMS) handle charging automatically, preventing overcharging and maximizing lifespan.
- Weight: Significantly lighter than lead-acid batteries of comparable capacity, improving towing efficiency.
The lighter weight of lithium-ion batteries reduces strain on your tow vehicle and improves fuel economy. Their longer lifespan translates to fewer replacements and reduced long-term costs. The advanced BMS in lithium-ion systems often simplifies the battery switch operation by providing more precise voltage and current monitoring. However, the higher initial cost can be a barrier for some.
So, you’re prepping for your next adventure in your travel trailer, right? Knowing how your battery system works is key. Check out this helpful guide on the battery switch on travel trailer function to understand how to manage your power. This is especially important if you’re planning an off-grid trip. Understanding this simple switch can save you from a dead battery and a ruined vacation! For another perspective, you might also want to browse this article about the battery switch on travel trailer function – it offers a slightly different approach to the same topic.
Both are great resources to ensure you’re a battery pro before you hit the road!
AGM (Absorbent Glass Mat) Batteries
AGM batteries represent a middle ground between flooded lead-acid and lithium-ion batteries. They are a sealed lead-acid type offering some improvements over traditional flooded lead-acid.
- Lifespan: Generally longer than flooded lead-acid, typically 5-7 years, but shorter than lithium-ion.
- Charging Requirements: Similar to flooded lead-acid, but generally more tolerant of slight overcharging.
- Weight: Heavier than lithium-ion but lighter than comparable flooded lead-acid batteries.
AGM batteries offer a balance between cost and performance. They are spill-proof and require less maintenance than flooded lead-acid, making them a convenient option. Their impact on the battery switch is similar to flooded lead-acid, though their slightly improved charging characteristics might reduce stress on the switch components.
Battery Switch Maintenance and Upkeep
Keeping your travel trailer’s battery switch in good working order is crucial for reliable power. A well-maintained switch ensures your batteries are properly connected and protected, preventing potential damage and maximizing their lifespan. Neglecting maintenance can lead to frustrating power outages and costly repairs. Regular inspection and cleaning are key to preventing problems before they arise.
Battery Switch Maintenance Schedule
A proactive approach to battery switch maintenance is best. This involves a regular inspection and cleaning schedule, coupled with occasional more thorough checks. A good rule of thumb is to inspect your switch visually at least once a month, and to perform a more thorough cleaning and inspection every six months, or before and after each extended trip.
More frequent checks might be needed in harsh environments, such as those with significant dust, moisture, or salt spray.
Tips for Extending Battery Switch Lifespan
Several practices can significantly extend the life of your battery switch. Avoiding excessive force when operating the switch is paramount. Rough handling can damage internal components, leading to premature failure. Keeping the switch clean and dry prevents corrosion, which is a major contributor to switch malfunction. Properly securing the switch to prevent vibration also helps to prolong its lifespan.
Finally, using a high-quality switch, properly sized for your battery bank, will also pay off in the long run.
Okay, so you’re wondering about your travel trailer’s battery system? That’s totally normal! Understanding how the battery switch works is key to avoiding dead batteries. Check out this helpful guide on the battery switch on travel trailer function to get a basic grasp. Then, for more in-depth info, including troubleshooting tips, dive into this other resource on the battery switch on travel trailer function – it covers everything from maintenance to common problems.
Knowing how to use your battery switch correctly will keep your trailer’s lights and appliances running smoothly!
Cleaning and Inspecting a Battery Switch
Cleaning your battery switch is a straightforward process. First, disconnect the batteries to prevent accidental shorts. Then, use a wire brush or a stiff brush to remove any dirt, debris, or corrosion from the switch terminals and surrounding areas. A solution of baking soda and water can help neutralize any acid buildup. After cleaning, thoroughly dry the switch with a clean cloth.
Visually inspect the switch for any signs of damage, such as loose connections, cracks, or burn marks. If you find any issues, consult a qualified technician before using the switch.
Signs a Battery Switch Needs Replacement
Several indicators suggest your battery switch requires replacement. Persistent corrosion despite cleaning is a strong sign. If the switch feels loose or wobbly, or if it operates erratically (e.g., intermittently connects or disconnects), replacement is necessary. Visible damage such as cracks, melting, or burn marks on the switch housing or terminals also indicates a need for replacement.
Finally, if you experience unexplained power outages or intermittent battery charging, the switch could be at fault and should be inspected.
Improving Battery Switch System Performance
Optimizing your travel trailer’s battery switch system ensures reliable power and extends the lifespan of your batteries. Proper charging, maintenance, and monitoring are key to maximizing performance and avoiding costly repairs. This section details practical methods to achieve this.
Efficient power management through your battery switch starts with understanding your charging sources and load demands. A properly configured system allows you to selectively charge and use batteries, preventing overcharging or deep discharging, both of which can damage batteries. Careful consideration of cable sizing and connection quality is also crucial for minimizing voltage drop and maximizing efficiency.
Battery Charging Optimization, Battery switch on travel trailer function
Effective charging involves using the correct charging profile for your battery type (flooded lead-acid, AGM, lithium). Overcharging can generate excessive heat and produce gases (in flooded lead-acid batteries), while undercharging leads to premature sulfation and reduced capacity. Employing a smart charger that automatically adjusts its output based on battery type and state of charge is highly beneficial. Additionally, ensuring your alternator (for vehicle charging) and solar panel controller are correctly sized and configured for your battery bank is crucial for safe and efficient charging.
Preventing Battery Terminal Corrosion
Corrosion on battery terminals creates resistance, reducing current flow and potentially leading to overheating and system failure. Regular cleaning is essential. Use a wire brush to remove corrosion, then apply a battery terminal protector (grease or anti-corrosion spray) to prevent future buildup. Tighten terminal connections regularly; loose connections generate heat and exacerbate corrosion.
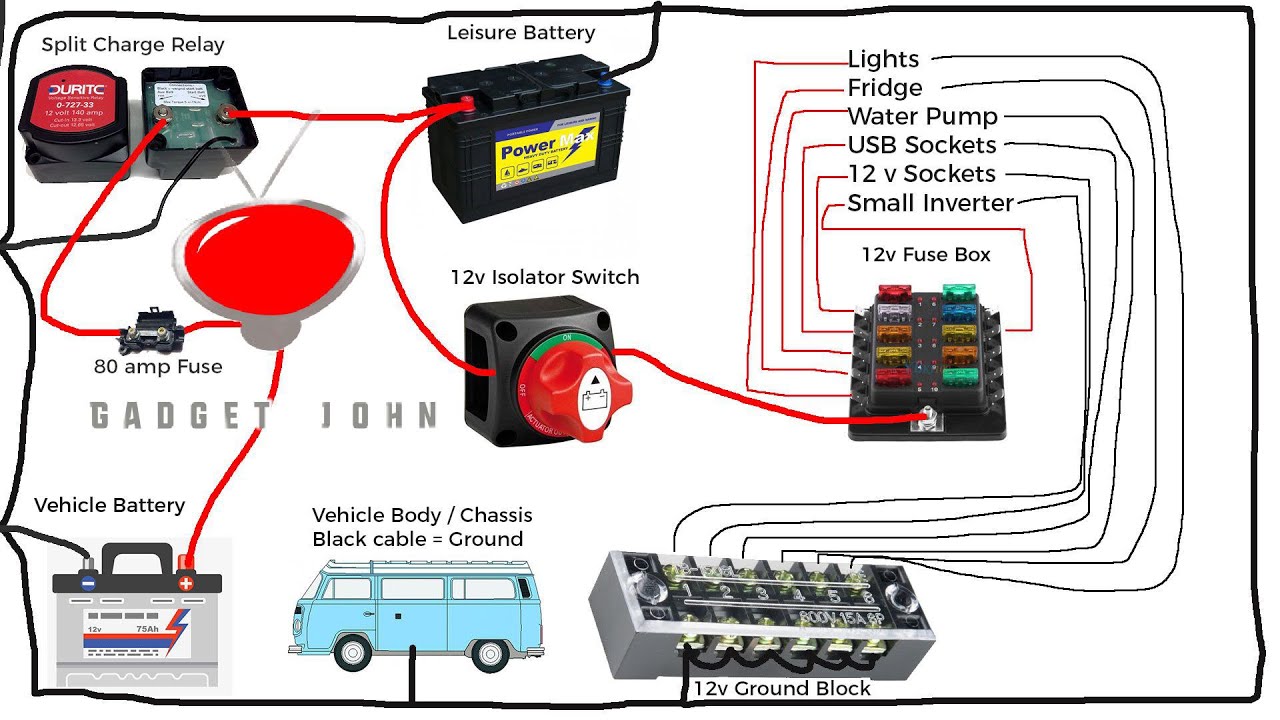
Properly Wired and Maintained Battery Switch System
Imagine a system with two 12V deep-cycle batteries connected to a battery switch. Each battery is connected to a heavy-gauge wire (at least 4 AWG, but ideally 2 AWG or larger depending on the battery bank capacity and distance to the switch), securely crimped to a lug. These lugs are then connected to the battery switch’s input terminals. The output terminals of the switch are connected to the load center via equally robust wiring.
All connections should be clean, tight, and protected with anti-corrosion grease. The entire system should be neatly organized and secured to prevent accidental damage or short circuits. Using appropriately sized fuses or circuit breakers at both the battery and load center is crucial for safety. A ground wire, also heavy-gauge, directly connects the battery negative terminals to the chassis ground point, creating a complete circuit.
Benefits of Using a Battery Monitor
A battery monitor provides real-time data on battery voltage, current, and state of charge (SOC). This allows you to track your battery’s health, identify potential issues (like parasitic drains), and optimize charging strategies. Knowing your SOC prevents deep discharging, which significantly shortens battery life. For example, a monitor might alert you to a slowly draining battery, prompting you to investigate and fix a problem before it causes a complete discharge.
The data provided by the monitor aids in proactive maintenance, maximizing battery lifespan and preventing unexpected power outages.
Mastering your travel trailer’s battery switch isn’t just about avoiding breakdowns; it’s about maximizing your enjoyment on the road. By understanding the function of your battery switch, performing regular maintenance, and knowing how to troubleshoot problems, you’ll ensure reliable power for all your adventures. Remember safety first – always disconnect the battery before working on the system. Happy travels!
FAQ Explained
What happens if my battery switch is stuck in the “off” position?
If your switch is stuck off, you’ll have no power to your house batteries. Check the switch itself for any mechanical issues. If it’s electrically faulty, you’ll need a replacement or professional help.
How often should I clean my battery terminals?
Clean your battery terminals at least twice a year, or more often if you notice corrosion. Use a wire brush and baking soda solution to remove corrosion.
Can I use a different type of battery in my travel trailer than what came originally equipped?
While you can often switch battery types (e.g., from lead-acid to lithium), it’s crucial to ensure compatibility with your charging system and battery switch. Consult with an RV specialist to avoid damaging your system.
My battery switch keeps tripping. What could be wrong?
A constantly tripping switch often indicates an overcurrent situation. This might be due to a short circuit, a faulty appliance drawing too much power, or a problem with the wiring itself. Thoroughly inspect your wiring and appliances before attempting to use the switch again.
